Tkinterで使われるbuttonとは?コード例を交えて実践的な活用方法を解説
今回はTkinterで使われるbuttonに関して、コード例を交えて、実践的な活用方法を解説いたします。最近Tkinterを使い始めた、buttonの理解を深めたい方へおすすめです。ぜひ最後までご覧ください。
執筆者 - おすすめの記事3選


そもそもTkinterで利用されるbuttonとは?
Tkinterで活用するbuttonとは、Widgetの一種で「何か(検索する、購入するなど)をする」という目的の為に押すものを意味します。
Webページやアプリ内で使われるようなボタンを想像すると良いでしょう。
別名button Widgetと呼ばれます。
聞き慣れない言葉がいくつか出てきましたね。。以下の「Tkinterの構成要素」を確認しながら、理解を深めましょう。
Tkinterの構成要素
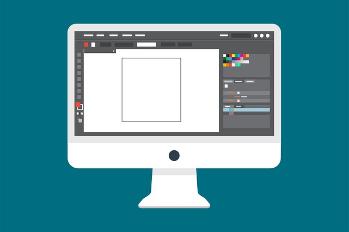
Tkinterの構成要素として、Window, Frame, Widgetの概念が存在します。
| 名称 | 説明文 |
|---|---|
| Window | 画像の青色枠の部分になります。Tkinter画面全体を表します。 |
| Frame | 画像内の黄緑色枠の部分になります。Widgetが1つ以上あった場合に、取りまとめるものです。 |
| Widget | 紫色枠で囲まれる部分になります。1つの機能を持つ最小単位 = Widgetと考えると良いでしょう。 |
前の章でTkinterで活用するbuttonとは、Widgetの一種で「何か(検索する、購入するなど)をする」という目的の為に押すものとお伝えしました。
「Tkinterの構成要素」の画像内では、紫色枠に該当するWidgetに対して、編集することになります。
Tkinterの構成要素を理解したところで、実際にbuttonの活用方法を理解していきましょう。
下準備
今回は先ほど紹介した「Tkinterの構成要素」の画像を元に、buttonの使い方をお伝えいたします。
下にコードを貼り付けておきますので、画像と見比べながら、コードを確認してみてください。できればコードに触れて、一緒にbuttonを体験しましょう。
1import tkinter as tk
2
3class Application(tk.Frame):
4    # ボタンがクリックされた場合に実行される関数
5    def clickCommand(self):
6        print("ボタンがクリックされました。")
7
8    def __init__(self, master=None):
9        # Windowの初期設定を行う。
10        super().__init__(master)
11
12        # Windowの画面サイズを設定する。
13        # geometryについて : https://kuroro.blog/python/rozH3S2CYE0a0nB3s2QL/
14        self.master.geometry("300x200")
15
16        # Windowを親要素として、frame Widget(Frame)を作成する。
17        # Frameについて : https://kuroro.blog/python/P20XOidA5nh583fYRvxf/
18        frame = tk.Frame(self.master)
19
20        # Windowを親要素とした場合に、frame Widget(Frame)をどのように配置するのか?
21        # packについて : https://kuroro.blog/python/UuvLfIBIEaw98BzBZ3FJ/
22        frame.pack()
23
24        # frame Widget(Frame)を親要素として、button Widgetを作成する。
25        # text : テキスト情報
26        # width : ボタン幅の設定
27        # height : ボタンの高さ設定
28        # foreground : テキスト色の設定
29        # 色について : https://kuroro.blog/python/YcZ6Yh4PswqUzaQXwnG2/
30        button = tk.Button(frame, text="PUSH !", width=10, height=3, foreground='#fff')
31
32        # frame Widget(Frame)を親要素とした場合に、button Widgetをどのように配置するのか?
33        # packについて : https://kuroro.blog/python/UuvLfIBIEaw98BzBZ3FJ/
34        button.pack()
35
36# Tkinter初学者参考 : https://docs.python.org/ja/3/library/tkinter.html#a-simple-hello-world-program
37if __name__ == "__main__":
38    # Windowを生成する。
39    # Windowについて : https://kuroro.blog/python/116yLvTkzH2AUJj8FHLx/
40    root = tk.Tk()
41    app = Application(master=root)
42
43    # Windowをループさせて、継続的にWindow表示させる。
44    # mainloopについて : https://kuroro.blog/python/DmJdUb50oAhmBteRa4fi/
45    app.mainloop()
上記のコードをPython環境で実行すると、「Tkinterの構成要素」で紹介した画像の結果が表示されます。
Tkinterで活用されるbutton Widgetの定義
button Widgetは、
1import tkinter as tk
2
3tk.Button(option1, option2, ...) or tk.Button('親要素', option1, option2, ...)
で定義されます。
button Widgetで使われるoptionの種類としては
- padx, pady
- background, bg
- fg, foreground
- height, width
- borderwidth, bd
- anchor
- relief
- overrelief
- cursor
- text
- font
- wraplength
- justify
- image
- state
- disabledforeground
- activeforeground
- activebackground
- command
- bitmap
- compound
- repeatdelay repeatinterval
- textvariable
があります。順番に見ていきましょう。
※ optionの種類一覧を調べたい場合は、以下のようにコードを記述してご確認ください。
1import tkinter as tk
2
3# buttonを生成する。
4button = tk.Button()
5# buttonに関するoptionの種類一覧を取得する。
6print(button.keys())
padx, pady
padx option, pady optionを利用すると、文字列(PUSH !)の外側へ空白の幅を設定できます。
例えば下準備コードのbutton = tk.Button(frame, text="PUSH !", width=10, height=3, foreground='#fff')箇所を、以下のように変更すると、
1# 別解法 ##########################
2# button = tk.Button(frame)
3# button.config(text="PUSH !", width=10, height=3, foreground='#fff', padx=40, pady=40) or button.configure(text="PUSH !", width=10, height=3, foreground='#fff', padx=40, pady=40)
4##################################
5button = tk.Button(frame, text="PUSH !", width=10, height=3, foreground='#fff', padx=40, pady=40)
以下の画像のようにbutton Widgetを描画します。
background, bg
background option, bg optionを利用すると、button Widgetの背景色を設定できます。
backgroundとbg両方のoptionを用いて、値を設定した場合、後ろの引数に設定されるoptionが優先されます。
※ 2021年6月18日現在、筆者のMac OSではbackground option, bg optionを設定しても、button Widgetの背景色は変更されませんでした。調べたところ、Mac OSには対応していない模様です。(参考)
代わりにtkmacosxを活用すると、背景色を設定できます。(tkmacosxのインストールとドキュメント)
fg, foreground
fg option, foreground optionを利用すると、文字列色を変更できます。
fgとforeground両方のoptionを用いて、値を設定した場合、後ろの引数に設定されるoptionが優先されます。
色に関しては、Tkinterの色の使い方とは?活用例から色の一覧をまとめて紹介!?で総括していますので、詳しく知りたい方は是非ご確認ください。

例えば下準備コードのbutton = tk.Button(frame, text="PUSH !", width=10, height=3, foreground='#fff')箇所を、以下のように変更すると、
1# 別解法 ##########################
2# button = tk.Button(frame)
3# button.config(text="PUSH !", width=10, height=3, foreground='red') or button.configure(text="PUSH !", width=10, height=3, foreground='red')
4##################################
5# 色について : https://kuroro.blog/python/YcZ6Yh4PswqUzaQXwnG2/
6button = tk.Button(frame, text="PUSH !", width=10, height=3, foreground='red')
以下の画像のようにbutton Widgetを描画します。
height, width
height option, width optionを利用すると、button Widgetの高さ、幅を設定できます。
例えば下準備コードのbutton = tk.Button(frame, text="PUSH !", width=10, height=3, foreground='#fff')箇所を、以下のように変更すると、
1# 別解法 ##########################
2# button = tk.Button(frame)
3# button.config(text="PUSH !", width=20, height=10, foreground='#fff') or button.configure(text="PUSH !", width=20, height=10, foreground='#fff')
4##################################
5button = tk.Button(frame, text="PUSH !", width=20, height=10, foreground='#fff')
以下の画像のようにbutton Widgetを描画します。
borderwidth, bd
borderwidth option, bd optionを利用すると、button Widgetの枠の大きさを設定できます。
borderwidthとbd両方のoptionを用いて、値を設定した場合、後ろの引数に設定されるoptionが優先されます。
例えば下準備コードのbutton = tk.Button(frame, text="PUSH !", width=10, height=3, foreground='#fff')箇所を、以下のように変更すると、
1# 別解法 ##########################
2# button = tk.Button(frame)
3# button.config(text="PUSH !", width=10, height=3, foreground='#fff', bd=30) or button.configure(text="PUSH !", width=10, height=3, foreground='#fff', bd=30)
4##################################
5button = tk.Button(frame, text="PUSH !", width=10, height=3, foreground='#fff', bd=30)
以下の画像のようにbutton Widgetを描画します。
anchor
anchor optionを利用すると、button Widgetで表示する文字列を、どこに配置するかを決定できます。
指定できる値として
- tk.W : Westの略。左の真ん中へbutton Widgetの文字列を配置する。
- tk.N : Northの略。上の真ん中へbutton Widgetの文字列を配置する。
- tk.S : Southの略。下の真ん中へbutton Widgetの文字列を配置する。
- tk.E : Eastの略。右の真ん中へbutton Widgetの文字列を配置する。
- tk.NE : North Eastの略。右上へbutton Widgetの文字列を配置する。
- tk.NW : North Westの略。左上へbutton Widgetの文字列を配置する。
- tk.SW : South Westの略。左下へbutton Widgetの文字列を配置する。
- tk.SE : South Eastの略。右下へbutton Widgetの文字列を配置する。
- tk.CENTER : 中心の略。中心へbutton Widgetの文字列を配置する。
の9種類が存在します。デフォルトではtk.CENTERが設定されます。
anchorに関する値入力へ悩んだ方は、以下の画像を確認しながら、anchorの値を考えると良いでしょう。
例えば下準備コードのtk.Button(frame, text="PUSH !", width=10, height=3, foreground='#fff')箇所を、以下のように変更すると、
1# 別解法 ##########################
2# button = tk.Button(frame)
3# button.config(text="PUSH !", width=10, height=3, foreground='#fff', anchor=tk.SE) or button.configure(text="PUSH !", width=10, height=3, foreground='#fff', anchor=tk.SE)
4##################################
5tk.Button(frame, text="PUSH !", width=10, height=3, foreground='#fff', anchor=tk.SE)
以下の画像のようにbutton Widgetを描画します。
relief
relief optionを利用すると、button Widgetの枠のデザインを設定できます。
指定できる値としては、
- tk.RAISED
- tk.SUNKEN
- tk.FLAT
- tk.RIDGE
- tk.GROOVE
- tk.SOLID
の6種類があります。
※ 2021年6月18日現在、筆者のMac OSではrelief optionを指定しても、button Widgetの枠のデザインは変更されませんでした。調べたところ、Mac OSには対応していない模様です。(参考)
代わりにtkmacosxを活用すると、button Widgetの枠のデザインを設定できます。(tkmacosxのインストールとドキュメント)
overrelief
overrelief optionを利用すると、button Widget内へマウスカーソルを移動したときの、枠のデザインを設定できます。
指定できる値としては、
- tk.RAISED
- tk.SUNKEN
- tk.FLAT
- tk.RIDGE
- tk.GROOVE
- tk.SOLID
の6種類があります。
※ 2021年6月18日現在、筆者のMac OSではoverrelief optionを指定しても、button Widget内へマウスカーソルを移動したときの、枠のデザインは変更されませんでした。調べたところ、Mac OSには対応していない模様です。(参考)
代わりにtkmacosxを活用すると、button Widget内へマウスカーソルを移動したときの、枠のデザインを設定できます。(tkmacosxのインストールとドキュメント)
cursor
cursor optionを利用すると、button Widget内へマウスカーソルを移動すると矢印の見た目を変化できます。
見た目のバリエーションについてはこちらのサイトにまとまっていますので、ご確認ください。
例えば下準備コードのbutton = tk.Button(frame, text="PUSH !", width=10, height=3, foreground='#fff')箇所を、以下のように変更して、
1# 別解法 ##########################
2# button = tk.Button(frame)
3# button.config(text="PUSH !", width=10, height=3, foreground='#fff', cursor="clock") or button.configure(text="PUSH !", width=10, height=3, foreground='#fff', cursor="clock")
4##################################
5button = tk.Button(frame, text="PUSH !", width=10, height=3, foreground='#fff', cursor="clock")
button Widget内へマウスカーソルを移動すると、矢印の見た目が変更します。
text
text optionを利用すると、button Widgetで利用する文字列を設定できます。
例えば下準備コードのbutton = tk.Button(frame, text="PUSH !", width=10, height=3, foreground='#fff')箇所を、以下のように変更すると、
1# 別解法 ##########################
2# button = tk.Button(frame)
3# button.config(text="テストテスト", width=10, height=3, foreground='#fff') or button.configure(text="テストテスト", width=10, height=3, foreground='#fff')
4##################################
5button = tk.Button(frame, text="テストテスト", width=10, height=3, foreground='#fff')
以下の画像のようにbutton Widgetを描画します。
font
font optionを利用すると、文字の形式や大きさを変更できます。
fontに関しては、Tkinterで使われるフォントって?2種類のフォントの設定方法を丁寧に解説でまとめておりますので、詳しく知りたい方は是非ご確認ください。

例えば下準備コードのbutton = tk.Button(frame, text="PUSH !", width=10, height=3, foreground='#fff')箇所を、以下のように変更すると、
1# 別解法 ##########################
2# button = tk.Button(frame)
3# button.config(text="PUSH !", width=10, height=3, foreground='#fff', font=("", 0, "underline")) or button.configure(text="PUSH !", width=10, height=3, foreground='#fff', font=("", 0, "underline"))
4##################################
5# fontについて : https://kuroro.blog/python/RZNjLl36upkumxwkTRWl/
6button = tk.Button(frame, text="PUSH !", width=10, height=3, foreground='#fff', font=("", 0, "underline"))
以下の画像のようにbutton Widgetを描画します。
wraplength
wraplength optionを利用すると、button Widgetで利用する文字列の折り返し幅を設定できます。
例えば下準備コードのbutton = tk.Button(frame, text="PUSH !", width=10, height=3, foreground='#fff')箇所を、以下のように変更すると、
1# 別解法 ##########################
2# button = tk.Button(frame)
3# button.config(text="buttonbuttonbuttonbuttonbuttonbuttonbuttonbutton", width=10, height=3, foreground='#fff', wraplength=60) or button.configure(text="buttonbuttonbuttonbuttonbuttonbuttonbuttonbutton", width=10, height=3, foreground='#fff', wraplength=60)
4##################################
5button = tk.Button(frame, text="buttonbuttonbuttonbuttonbuttonbuttonbuttonbutton", width=10, height=3, foreground='#fff', wraplength=60)
以下の画像のようにbutton Widgetを描画します。
justify
justify optionを利用すると、button Widgetで利用する文字列をどちらに揃えるか設定できます。
指定できる値としては、
- tk.LEFT : 左寄せ
- tk.CENTER : 中央寄せ(デフォルト)
- tk.RIGHT : 右寄せ
の3種類があります。
例えば下準備コードのbutton = tk.Button(frame, text="PUSH !", width=10, height=3, foreground='#fff')箇所を、以下のように変更すると、
1# 別解法 ##########################
2# button = tk.Button(frame)
3# button.config(text="buttonbuttonbuttonbuttonbutton", width=10, height=3, foreground='#fff', wraplength=60, justify=tk.RIGHT) or button.configure(text="buttonbuttonbuttonbuttonbutton", width=10, height=3, foreground='#fff', wraplength=60, justify=tk.RIGHT)
4##################################
5button = tk.Button(frame, text="buttonbuttonbuttonbuttonbutton", width=10, height=3, foreground='#fff', wraplength=60, justify=tk.RIGHT)
以下の画像のようにbutton Widgetを描画します。
image
image optionを利用すると、button Widgetへ画像を貼り付ける設定ができます。
例えば下準備コードを、以下のように変更すると、
1+    # 画像について : https://kuroro.blog/python/Z7k1LSyDyiDHtD5UCjmG/
2+    global image
3+    image = tk.PhotoImage(file="/{画像のパス}/{画像ファイル名}.{拡張子}")
4-    button = tk.Button(frame, text="PUSH !", width=10, height=3, foreground='#fff')
5+    button = tk.Button(frame, text="PUSH !", width=500, height=500, image=image)
以下の画像のようにbutton Widgetを描画します。
画像の取り扱いに関しては、【もう間違えない!?】PythonのTkinterを用いて画像を表示する方法でまとめましたので、うまく表示されない、サンプルコードを確認したい方はご確認ください。

state
state optionを利用すると、button Widgetの状態を設定できます。
指定できる値としては、
- normal : ボタンクリックを有効(デフォルト)
- disabled : ボタンクリックを無効。
があります。
例えば下準備コードのbutton = tk.Button(frame, text="PUSH !", width=10, height=3, foreground='#fff')箇所を、以下のように変更すると、
1# 別解法 ##########################
2# button = tk.Button(frame)
3# button.config(text="PUSH !", width=10, height=3, foreground='#fff', state='disabled') or button.configure(text="PUSH !", width=10, height=3, foreground='#fff', state='disabled')
4##################################
5button = tk.Button(frame, text="PUSH !", width=10, height=3, foreground='#fff', state='disabled')
以下の画像のようにbutton Widgetを描画します。
disabledforeground
disabledforeground optionを利用すると、button Widgetの状態(state)がdisabledの時の、文字列色を設定できます。
例えば下準備コードのbutton = tk.Button(frame, text="PUSH !", width=10, height=3, foreground='#fff')箇所を、以下のように変更すると、
1# 別解法 ##########################
2# button = tk.Button(frame)
3# button.config(text="PUSH !", width=10, height=3, foreground='#fff', state='disabled', disabledforeground='yellow') or button.configure(text="PUSH !", width=10, height=3, foreground='#fff', state='disabled', disabledforeground='yellow')
4##################################
5# 色について : https://kuroro.blog/python/YcZ6Yh4PswqUzaQXwnG2/
6button = tk.Button(frame, text="PUSH !", width=10, height=3, foreground='#fff', state='disabled', disabledforeground='yellow')
以下の画像のようにbutton Widgetを描画します。
activeforeground
activeforeground optionを利用すると、button Widgetをクリックした時の文字列色を設定できます。
例えば下準備コードのbutton = tk.Button(frame, text="PUSH !", width=10, height=3, foreground='#fff')箇所を、以下のように変更すると、
1# 別解法 ##########################
2# button = tk.Button(frame)
3# button.config(text="PUSH !", width=10, height=3, foreground='#fff', activeforeground='purple') or button.configure(text="PUSH !", width=10, height=3, foreground='#fff', activeforeground='purple')
4##################################
5# 色について : https://kuroro.blog/python/YcZ6Yh4PswqUzaQXwnG2/
6button = tk.Button(frame, text="PUSH !", width=10, height=3, foreground='#fff', activeforeground='purple')
以下の画像のようにbutton Widgetを描画します。
activebackground
activebackground optionを利用すると、button Widgetをクリックした時の背景色を設定できます。
※ 2021年6月18日現在、筆者のMac OSではactivebackground optionを指定しても、button Widgetをクリックした時の背景色は変更されませんでした。調べたところ、Mac OSには対応していない模様です。(参考)
代わりにtkmacosxを活用すると、button Widgetをクリックした時の背景色を変更できます。(tkmacosxのインストールとドキュメント)
command
command optionを利用すると、ボタンをクリックした時に実行する関数を設定できます。
例えば下準備コードのbutton = tk.Button(frame, text="PUSH !", width=10, height=3, foreground='#fff')箇所を、以下のように変更して、
1# 別解法 ##########################
2# button = tk.Button(frame)
3# button.config(text="PUSH !", width=10, height=3, foreground='#fff', command=self.clickCommand) or button.configure(text="PUSH !", width=10, height=3, foreground='#fff', command=self.clickCommand)
4##################################
5button = tk.Button(frame, text="PUSH !", width=10, height=3, foreground='#fff', command=self.clickCommand)ボタンをクリックすると、clickCommand関数が実行されて、以下の画像のように「ボタンがクリックされました。」と表示されます。
またcommand optionの代わりに、bind関数を利用する方法があります。
例えば下準備コードを、以下のように変更して、
1-    def clickCommand(self):
2+    def clickCommand(self, event):
3        print("ボタンがクリックされました。")
4
5     def __init__(self, master=None):
6        ...
7        button = tk.Button(frame, text="PUSH !", width=10, height=3, foreground='#fff')
8+       # bind関数 : イベント(ボタンクリック、文字入力など)が発生した場合に、実行する関数を設定する。
9+       # 第一引数 : イベント内容。<ButtonPress> : ボタンがクリックされたとき。
10+       # 第二引数 : 第一引数が実行された(ボタンがクリックされた)場合に、呼び出す関数。self.clickCommandとする。
11+       # bind関数について : https://kuroro.blog/python/eI5ApJE1wkU7bHsuwk0H/
12+       button.bind("<ButtonPress>", self.clickCommand)
ボタンをクリックすると、command optionの時と同じように「ボタンがクリックされました。」と表示されます。
bind関数に関しては、【コード付】Tkinterで使われるbindとは?bindの仕組みを交えて解説でまとめていますので、詳しく知りたい方は是非ご確認ください。

bitmap
bitmap optionを利用すると、XBM形式の2値画像(白と黒のみで表現される画像)を、設定できます。
Tkinterでは標準でいくつかのXBM形式の2値画像を備えていて、
- error
- gray75
- gray50
- gray25
- gray12
- hourglass
- info
- questhead
- question
- warning
が存在します。上で紹介されるXBM形式の2値画像の詳細を知りたい場合は、こちらのリンクを確認ください。
例えば下準備コードのbutton = tk.Button(frame, text="PUSH !", width=10, height=3, foreground='#fff')箇所を、以下のように変更すると、
1# 別解法 ##########################
2# button = tk.Button(frame)
3# button.config(text="PUSH !", width=100, height=100, foreground='#fff', bitmap="error") or button.configure(text="PUSH !", width=100, height=100, foreground='#fff', bitmap="error")
4##################################
5button = tk.Button(frame, text="PUSH !", width=100, height=100, foreground='#fff', bitmap="error")
以下の画像のようにbutton Widgetを描画します。
compound
compound optionを利用すると、button Widgetへ画像を貼り付ける場合に、文字列をどこに配置するのか設定できます。
指定できる値としては
- tk.LEFT : 文字列の左側へ画像を配置する。
- tk.RIGHT : 文字列の右側へ画像を配置する。
- tk.BOTTOM : 文字列の下側へ画像を配置する。
- tk.TOP : 文字列の上側へ画像を配置する。
- tk.CENTER : 画像の真ん中へ文字列を配置する。
- tk.NONE : 文字列を表示しない(デフォルト)
の6種類が存在します。
例えば下準備コードを、以下のように変更すると、
1+    # 画像について : https://kuroro.blog/python/Z7k1LSyDyiDHtD5UCjmG/
2+    global image
3+    image = tk.PhotoImage(file="/{画像のパス}/{画像ファイル名}.{拡張子}")
4-    button = tk.Button(frame, text="PUSH !", width=10, height=3, foreground='#fff')
5+    button = tk.Button(frame, text="button", width=100, height=100, image=image, compound=tk.CENTER, foreground='red')
以下の画像のようにbutton Widgetを描画します。
repeatdelay repeatinterval
repeatdelay option, repeatinterval optionを利用すると、ボタンを長押ししている最中に、関数を呼び出すことができます。
repeatdelay optionではボタンを長押しする前の、1回目のクリック判定(関数呼び出し)の時間を遅らせること(ミリ秒で設定)ができます。
repeatinterval optionではボタンを長押しした場合に、何秒間隔(ミリ秒で設定)でクリック判定(関数呼び出し)するのか設定できます。
例えば下準備コードのbutton = tk.Button(frame, text="PUSH !", width=10, height=3, foreground='#fff')箇所を、以下のように変更すると、
1# 別解法 ##########################
2# button = tk.Button(frame)
3# button.config(text="PUSH !", width=10, height=3, foreground='#fff', repeatdelay=200, repeatinterval=600, command=self.clickCommand) or button.configure(text="PUSH !", width=10, height=3, foreground='#fff', repeatdelay=200, repeatinterval=600, command=self.clickCommand)
4##################################
5button = tk.Button(frame, text="PUSH !", width=10, height=3, foreground='#fff', repeatdelay=200, repeatinterval=600, command=self.clickCommand)
ボタン押下後200ミリ秒後に、1回目のクリック判定(clickCommand関数呼び出し)を行い、その後600ミリ秒間隔ごとに、クリック判定(clickCommand関数呼び出し)を行います。
textvariable
textvariable optionを利用すると、button Widgetで利用する文字列を、可変に扱うことが可能になります。
例えば下準備コードを、以下のように変更すると、
1class Application(tk.Frame):
2+    # button Widgetの文字列情報を格納する変数
3+    buttonText = None
4
5     def clickCommand(self):
6+        # button Widgetの文字列情報を更新する。
7+        self.buttonText.set("ボタンがクリックされました。")
8
9     def __init__(self, master=None):
10         ...
11+        # button Widgetの文字列情報をstring型の変数とする。
12+        # StringVarについて : https://kuroro.blog/python/K53voPjJuKFfYrjmP8FP/
13+        self.buttonText = tk.StringVar()
14+        # button Widgetの文字列情報の初期化を行う。
15+        self.buttonText.set("クリックしてください")
16-        button = tk.Button(frame, text="PUSH !", width=10, height=3, foreground='#fff')
17+        # textvariable : button Widgetへ文字列を表示する。値を可変なself.buttonTextとする。
18+        button = tk.Button(frame, textvariable=self.buttonText, width=20, height=5, command=self.clickCommand)
始めに、以下の画像のようにbutton Widgetを描画して、
button Widgetをクリックすると、以下の画像のようにbutton Widgetを描画します。
StringVar()に関しては、Tkinterで使われるWidget変数とは?StringVarを中心に解説!?でまとめていますので、詳しく知りたい方は是非ご確認ください。

ttk.Button()を利用してみる
ttk.Button()とは、テーマ(名前)を指定して、外観を変更するbutton Widgetを意味します。
button Widgetの拡張と考えるとよいでしょう。Tkinterのversion 8.5で導入されました。
ttk.Button()を利用するためには、tkinterからttkをimportする必要があります。
1# tkinterからttkをimportする
2from tkinter import ttktk.Button()との違いとしては、
- 使用できるoptionに違いがある
- テーマ(名前)を利用して、button widgetの外観を変更する
があります。順に見ていきましょう。
使用できるoptionに違いがある
こちらはコードの結果を確認するとわかります。
例えば以下のようなコードを作成すると、
1import tkinter as tk
2from tkinter import ttk
3
4class Application(tk.Frame):
5    def __init__(self, master=None):
6        # Windowの初期設定を行う。
7        super().__init__(master)
8
9        # Windowの画面サイズを設定する。
10        # geometryについて : https://kuroro.blog/python/rozH3S2CYE0a0nB3s2QL/
11        self.master.geometry("300x200")
12
13        # Windowを親要素として、frame Widget(Frame)を作成する。
14        # Frameについて : https://kuroro.blog/python/P20XOidA5nh583fYRvxf/
15        frame = tk.Frame(self.master)
16
17        # Windowを親要素とした場合に、frame Widget(Frame)をどのように配置するのか?
18        # packについて : https://kuroro.blog/python/UuvLfIBIEaw98BzBZ3FJ/
19        frame.pack()
20
21        # frame Widget(Frame)を親要素として、ttk button Widgetを作成する。
22        ttkButton = ttk.Button(frame)
23        print('ttk.Button option : ')
24        # ttk.Button()のoption一覧を表示する。
25        print(ttkButton.keys())
26
27        # frame Widget(Frame)を親要素として、button Widgetを作成する。
28        button = tk.Button(frame)
29        print('tk.Button option : ')
30        # tk.Button()のoption一覧を表示する。
31        print(button.keys())
32
33# Tkinter初学者参考 : https://docs.python.org/ja/3/library/tkinter.html#a-simple-hello-world-program
34if __name__ == "__main__":
35    # Windowを生成する。
36    # Windowについて : https://kuroro.blog/python/116yLvTkzH2AUJj8FHLx/
37    root = tk.Tk()
38    app = Application(master=root)
39
40    # Windowをループさせて、継続的にWindow表示させる。
41    # mainloopについて : https://kuroro.blog/python/DmJdUb50oAhmBteRa4fi/
42    app.mainloop()
以下の画像のように、optionの種類に差分が発生します。
テーマ(名前)を利用して、button Widgetの外観を変更
ttk.Button()では、テーマ(名前)を指定することで、button Widgetの外観を変更できます。
例えば以下のようなコードを作成すると、
1import tkinter as tk
2from tkinter import ttk
3
4class Application(tk.Frame):
5    def __init__(self, master=None):
6        # Windowの初期設定を行う。
7        super().__init__(master)
8
9        # Windowの画面サイズを設定する。
10        # geometryについて : https://kuroro.blog/python/rozH3S2CYE0a0nB3s2QL/
11        self.master.geometry("300x200")
12
13        # Windowを親要素として、frame Widget(Frame)を作成する。
14        # Frameについて : https://kuroro.blog/python/P20XOidA5nh583fYRvxf/
15        frame = tk.Frame(self.master)
16
17        # Windowを親要素とした場合に、frame Widget(Frame)をどのように配置するのか?
18        # packについて : https://kuroro.blog/python/UuvLfIBIEaw98BzBZ3FJ/
19        frame.pack()
20
21        # ttk.Button()の外観を変更
22        style = ttk.Style()
23        # テーマ(名前)の指定を行う。
24        style.theme_use('classic')
25
26        # frame Widget(Frame)を親要素として、ttk button Widgetを作成する。
27        # text : テキスト情報
28        ttkButton = ttk.Button(frame, text='ttk button')
29        # frame Widget(Frame)を親要素とした場合に、ttk button Widgetをどのように配置するのか?
30        # packについて : https://kuroro.blog/python/UuvLfIBIEaw98BzBZ3FJ/
31        ttkButton.pack()
32
33        # frame Widget(Frame)を親要素として、button Widgetを作成する。
34        # text : テキスト情報
35        button = tk.Button(frame, text='tk button')
36        # frame Widget(Frame)を親要素とした場合に、button Widgetをどのように配置するのか?
37        # packについて : https://kuroro.blog/python/UuvLfIBIEaw98BzBZ3FJ/
38        button.pack()
39
40# Tkinter初学者参考 : https://docs.python.org/ja/3/library/tkinter.html#a-simple-hello-world-program
41if __name__ == "__main__":
42    # Windowを生成する。
43    # Windowについて : https://kuroro.blog/python/116yLvTkzH2AUJj8FHLx/
44    root = tk.Tk()
45    app = Application(master=root)
46
47    # Windowをループさせて、継続的にWindow表示させる。
48    # mainloopについて : https://kuroro.blog/python/DmJdUb50oAhmBteRa4fi/
49    app.mainloop()
以下の画像のように、button Widgetを描画します。
また現在利用中のテーマ(名前)を確認する場合は、
1from tkinter import ttk
2
3style = ttk.Style()
4# 現在利用中のテーマ(名前)を確認
5currentTheme = style.theme_use()
6print(currentTheme)
利用できるテーマ(名前)の一覧を確認する場合は、
1from tkinter import ttk
2
3style = ttk.Style()
4# テーマ(名前)の一覧を確認
5allTheme = style.theme_names()
6print(allTheme)
テーマ(名前)の指定を行う場合は、
1from tkinter import ttk
2
3style = ttk.Style()
4# テーマ(名前)の指定を行う。
5style.theme_use('テーマ(名前)')
をご利用ください。
まとめ
- Tkinterは、Window, Frame, Widgetで構成される。
- Tkinterで活用するbuttonとは、Widgetの一種で「何か(検索する、購入するなど)をする」という目的の為に押すものを意味します。
- 別名button Widgetと呼ばれる。


参考文献
- Tkinterのbuttonに関するサンプルコード
- Webページとは?
- アプリとは?
- tkmacosxのインストールとドキュメント
- マウスカーソルとは?
- Tkinterで使われるマウスカーソルの種類
- 文字列の折り返しとは?
- XBMについて
- テーマとは?